Read the plans!
To get things started with the riveting of the bottom wing skins - i read the plans! In Step 4 on page 20-04 you start to rivet the inboard skins in place, however there was a note:
In Step 5 you begin to rivet the OUTBOARD wing skins, so i was confused - when did you rivet the forward end of the inboard skins if you stopped at the row just past the J-Stiffner? (as per the note)
The answer came when i remembered that when Van's places a note, it refers to the STEP AFTER the note. So, i was supposed to rivet the entire inboard skin in place, before moving onto the outboard skin.
Interference
As with all the wing skins, there lies a single rivet on each rib one hole forward of the J-Stiffner which ends up being under the "J" of the stiffner - my normal tungsten bar did not fit underneath. I had some big trouble with a rivet under a J-Stiffner on the aft fuselage, so i was a little hesitant to have so many rivets under the J-Stiffner. To try and avoid these i decided to rivet down the skin and include the single rivet forward of the J-Stiffner, and then slide the J-Stiffner into place. This would not be possible with the left wing, as the J-Stiffner has the ADAHRS mount already riveted to it, but i would cross that bridge when i came to it (and in the end it was not an issue!).
Finally Riveting
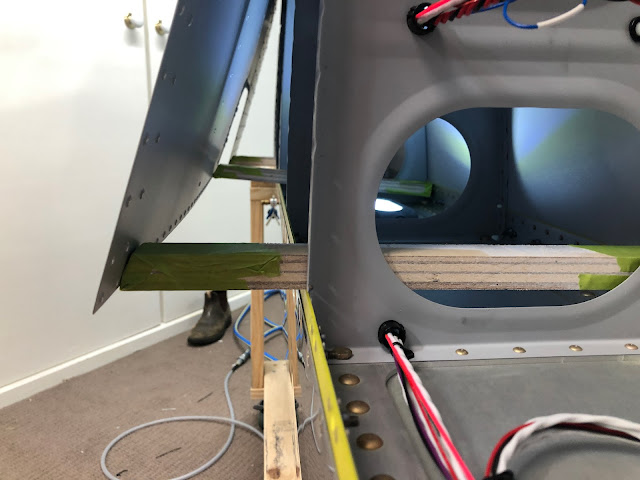
Riveting started in the centre of the skin at the wing spar. For the most part i was able to easily reach the aft spar rivets through the access panel hole, however there was one rib bay where i had to reach up from below. I found the key to this was to sit on a very low (maybe 10" tall) foot stool. This allowed me to be high enough to reach the spar, however low enough to get my arm under the skin. I used some little lengths of ply, which were cut at one end to an angle and covered in tape, to hole the skins out for reaching in.
 |
| Plywood sticks really helped in reaching the spar rivets. Once i got half way to the J-Stiffner i was able to reach all the other rivets through the holes in the ribs. |
 |
| I ended up with a massive bruise here. |
Rivet Order
The rivets were set in the following order - always starting in the centre of the skin (span wise) and working inboard and outboard evenly:
- Rear spar rivets
- Down each rib, half way to the J Stiffner.
- Slide the J Stiffner in place.
- Remaining rivets down to the J Stiffner
- Along the J stiffner
- Down each rib to the main spar
- Along the main spar
Flap Bracket Rivets
The only exception to the plans rivet callouts, was the 8 rivets around the flap bracket. I found that it was not very easy to get my swivel mushroom set in that close to the flap bracket, and was not very keen on using the backrivet set - i thought this was a sure-fire way to damage the skins. Especially since i was at the end of my reach - controlling the gun in this case is quite difficult already. So these rivets were drilled to #33, and a MK-319-BS rivet was used in these holes.
Left hand skin - troublesome rivets under the J Stiffner
As mentioned above, the single rivet on each rib under the J-Stiffner was going to be very hard to set. I thought i would have a look through my drawer and see which bucking bar was best to use - and found this little beauty, which i never tried in previous situations. I wish i had - because it worked perfectly! Every rivet under the J-Stiffner came out great - it needed a longer set time since the bar has less mass, but they were all great!
 |
| Here is the ADAHRS mount in place, with my DIY magnetometer shelf. |
 |
| I also removed the primer around the hole where the OAT probe will eventually be installed. |
Overall, i was very happy with how the inboard skins turned out - only 2 drilled out rivets in both skins!
I will install the access panel nutplates in one session at the end on all the skins.
 |
| Nice and flat - i learned to keep the pressure low to avoid large depressions at each rivet. |
 |
| This photo shows the "custom riveting stool" i stole from the kids bathroom. |
On to the outboard skins next!

.png)
.png)


No comments:
Post a Comment