8-07 -> 8:10: Dimpling HS Ribs, Priming and Dimpling HS skins, riveting HS ribs / spar together
Moving on, it was time to dimple all the ribs of the HS. As already mentioned, I decided to prime them first before dimpling them and i tested this on the nose ribs which worked great. After only 24 hours, the inspar ribs held up to the dimpling with no problem. Some of the ribs had holes which are not dimpled (as these will take nutplates for the empennage fairing waaay down the track) and these were covered with tape.
Once the ribs were complete, i moved onto the skins. This involved deburring the edges of the skins using the vixen file, edge deburring tool, sandpaper and scotchbirte. The holes were not deburred with a tool (as they are punched to final size), however i scuffed them both sides with a scotchbrite pad. I then cleaned the skins outside on the table using EkoClean, followed by etching with EkoEtch and mechanical scuffing. The skins were then dried and primed.
skin deburring
Cleaning and etching the skins.
Whilst the skins were drying, i moved onto riveting the stringer and web assembly together. I firstly riveted the ribs to the end flanges of the stringer web using a gun and bucking bar. I think i had the pressure set too high, as the ribs deformed a little bit where the rivets went in. Thinking it was ok, i moved onto riveting the web to the stringers using the squeezer, and this went fine. Once i was done, i really wasn't very happy with the deformed ribs - the more i looked at it the more i didn't like what i was seeing - the poor workmanship was bothering me. I drilled out the worst 2 rivets, and tried to re-rivet them together, however the ribs were deformed and i could not get the web flanges to sit flat - so out came the #31 drill bit and i drilled out all the stringer web to stringer rivets. Once the stringers were removed, i could then remove the rivets between the stringer web flanges and the ribs and start again!!!
Shouldn't have used the gun on such thin parts - or should have turned the pressure down to 20psi!
First i gently removed the bend in the rib webs using a hammer and and spoon and straightened the flanges of the stringer web with a hand seamer. I then did what i should have done all along, and used the squeezer to re-rivet the stringer web to the ribs, as well as the web to the stringers. Happy i did this rework, as it really was bothering me.
I think my reluctance to use the squeezer was due to the issues i had on the VS rear spar. I just couldn't get a rivet to set straight - it turned out the yoke was flexing too much due to the Cleveland quick release pins. Once i tightened the yoke onto the squeezer the tool worked a lot better. The use of a bit of tube over the rivet also helped keep the flanges flat onto the rib.
These were done with the squeezer and are a lot better.
The other thing to note relates to the little tabs which rivet the ribs to the stringers. Because the 2 modified inspar ribs are at an angle, the tab is rotated against the stringer, and contact the stringer at it's bend. I had to file back those tabs (respecting edge distance) to stop the little tabs interfering and rubbing on the stringers where the internal bend is.
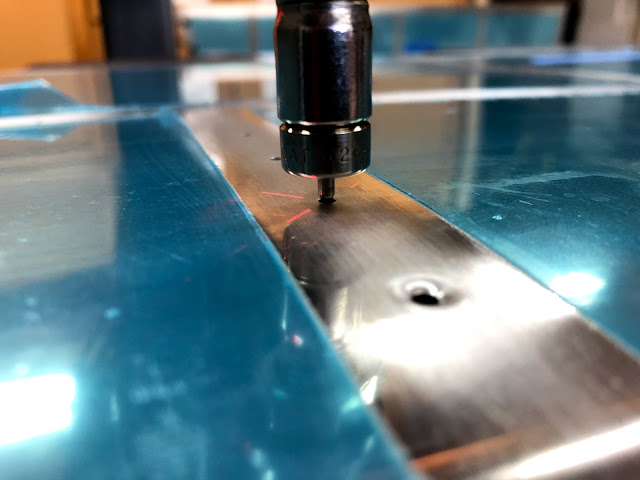
Once this section was complete, i moved onto dimpling the HS skins. I read a lot of people had to remove the handle off their DRDT2 to get it to fit inside the skins when dimpling near the nose. I decided to put the female die on the bottom and the male on the top, and was able to maneuver the skins over the edge of the bench and the 2 portable dimpling support tables i made up. I used a laser pointer to align the die and went slowly.
Nice Dimples!
I even had a great helper in the shop for the dimpling!
Moving on, i went ahead and riveted the inspar ribs to the forward spar using the squeezer.
Could you elaborate on this statement. Im right here too.. Tx "The use of a bit of tube over the rivet also helped keep the flanges flat onto the rib."


Could you elaborate on this statement. Im right here too.. Tx "The use of a bit of tube over the rivet also helped keep the flanges flat onto the rib."
ReplyDeleteHere you go: https://vansairforce.net/community/showthread.php?t=173704
Delete