
I want to prime my kit, so figured i better complete a practice kit which included the priming process, before i hit the real aircraft with the priming gun.
I would like to use Stewart Systems Eko-Poxy as the primer, due to the non-toxic nature of the product. I just can't see how i could use Alumiprep / Alodone and a toxic primer around the house with family, neighbours, dogs etc.
I ordered a practice kit from Stewart Systems and they modified it for me so that it included the Charcoal Grey color 2 Part Eko-Poxy, as well as the lighter grey single part Eko-Prime (mostly to check for color). I think i want to use the Eko-Poxy as it is much more durable and it really doesn't take much to add the catalyst to the paint (all the other priming steps would be the same).
The process started by mixing the Eko-Clean product 10:1 with standard tap water, and the Eko-Etch product 2:1 with standard tap water - i put this into spray bottles. The parts were sprayed with the Eko-Clean and washed down with a normal dish cloth (i made sure i used a new, clean one). Once this was done i then sprayed on the etch product, and scrubbed the whole surface with a maroon scotchbrite to both chemically and mechanically etch the parts.
The only issue i encountered was that the part numbers i had added to the parts with a blue sharpie, were removed by the scrubbing and the acid etch. I thought ahead that this may be a problem so attached some plastic tags (from milk bottles) to the parts with wire. This was a good idea (i thought) except the part numbers also washed off these!!! I think next time, i might just lay down some builders plastic or some paper and write the part numbers on that, and lay the parts down one at a time in order. Once they are all dry, write the parts numbers back on in a place that cant be seen once it is riveted together (such as the rib flanges). So long as i don't spray the primer too thick, it should be seen through the primer.
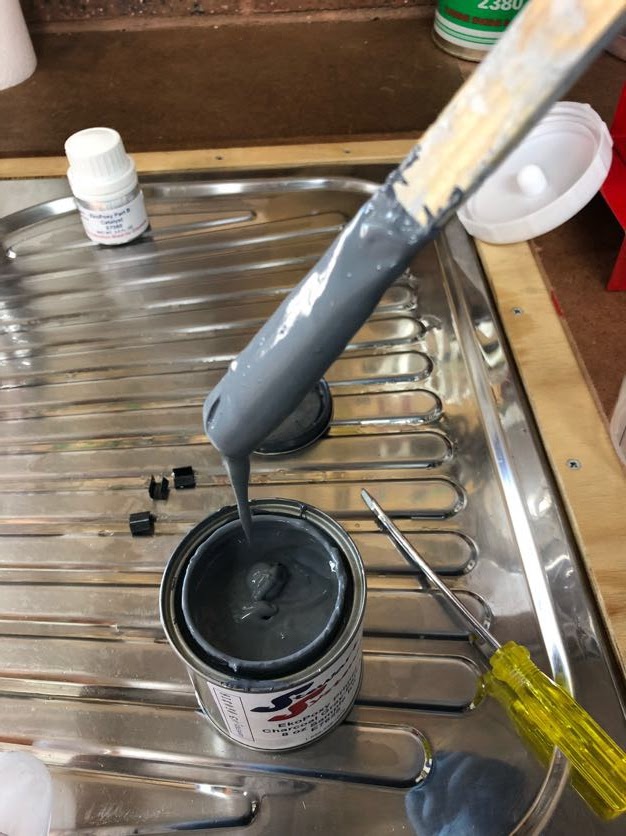
I have read on forums of the extreme thickness of the primer, and i certainly encountered the issue with the practice can they sent me. It was like peanut butter straight out of the can. I made sure I stored it in the house where it was a constant 20c, so this was not caused by incorrect storage.
Thinking that this was simply that the paint had lost some moisture and dried out, i added approx 30mls of distilled water:
This thinned out the can somewhat, to the consistency of Nutella. Too thick to spray though, so i added another 30mls of distilled water:
This time it thinned it out a bit more, so it began to drip off the stick like whipped cream. Still too thick to spray though, in my opinion (i was always taught it needed to be like milk to go through the gun). So i went ahead and added the remaining water i had in the cup (about 40 mls) - making it 100 mls into a 250 ml can - around 40% thinning. This time it came out like thickened cream (note i had to transfer it to a mixing cup, as the can was getting full).
At this point i thought it looked like i would expect paint to look. So i went ahead and added 3 coffee scoop fulls of paint to a clean mixing cup and weight it - it was 65 grams. I then added 18% of the catalyst (12 grams) bringing the weight on the scales up to 77 grams, and then 13% of the 65 grams (9 grams) bringing the total on the scale to 86 grams. This was then poured through a paint strainer into my gun. I used a new paint gun holder off ebay which worked great:


I think the charcoal grey is a good color, however i will paint the first completed practice kit with the other lighter grey so i can compare (or paint the son's toolbox maybe). I was not able to see the part numbers through the primer, so i think i laid it on a bit thick.
I wanted to see how quickly i could rivet after painting, so after riding the bikes at the park and lunch with the little bloke, around 5 hours later, i had a go at riveting. The paint held up to it very well with no issues riveting the skeleton together, nor backriveting the stiffners to the skins. The only issue was pulling off the rivet tape when backriveting - my finger nail lifted some paint on the outside of the skins. However, the only reason i painted the outisde of the skins was because i had some paint left, and i had not cleaned or etched this side of the skins. The paint seemed to adhere well initially, despite the finger prints and oils etc left on the skin. I only painted this side as i had some paint left over, but i will use it as a test to see how durable the primer is with no prep whatsoever.
I am not sure how i am supposed to use a drill to stir it as all the available hardware store mixers are way too big - but this warrants further investigation.
I would like to use Stewart Systems Eko-Poxy as the primer, due to the non-toxic nature of the product. I just can't see how i could use Alumiprep / Alodone and a toxic primer around the house with family, neighbours, dogs etc.
I ordered a practice kit from Stewart Systems and they modified it for me so that it included the Charcoal Grey color 2 Part Eko-Poxy, as well as the lighter grey single part Eko-Prime (mostly to check for color). I think i want to use the Eko-Poxy as it is much more durable and it really doesn't take much to add the catalyst to the paint (all the other priming steps would be the same).
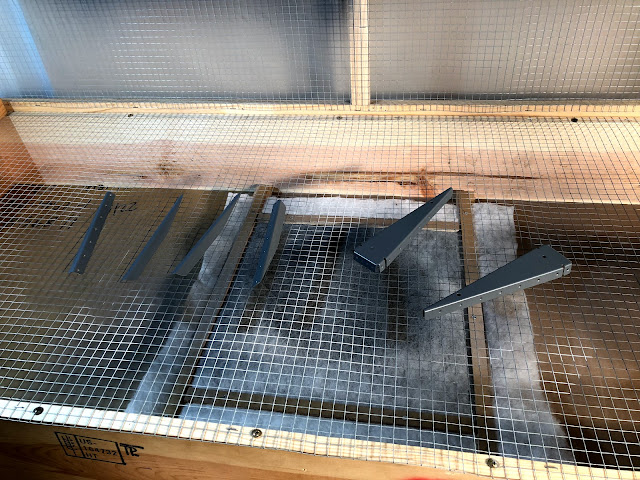
The process started by mixing the Eko-Clean product 10:1 with standard tap water, and the Eko-Etch product 2:1 with standard tap water - i put this into spray bottles. The parts were sprayed with the Eko-Clean and washed down with a normal dish cloth (i made sure i used a new, clean one). Once this was done i then sprayed on the etch product, and scrubbed the whole surface with a maroon scotchbrite to both chemically and mechanically etch the parts.
 |
| Drying in the booth after etching |
 |
| After etching |
I have read on forums of the extreme thickness of the primer, and i certainly encountered the issue with the practice can they sent me. It was like peanut butter straight out of the can. I made sure I stored it in the house where it was a constant 20c, so this was not caused by incorrect storage.
 |
| Like peanut butter - the stick stood up in the can. |
 |
| Nutella? |
 |
| Whipped cream? |
 |
| Thickened Cream? |

The actual spraying went very well. The paint sprayed out great, and the booth carried all the fumes and overspray away. Very happy with the result, although i think i may have put it on a bit thick. The LED worklight i was using was not bright enough, and i needed to use the halogen.
Here is how the parts came out:


I wanted to see how quickly i could rivet after painting, so after riding the bikes at the park and lunch with the little bloke, around 5 hours later, i had a go at riveting. The paint held up to it very well with no issues riveting the skeleton together, nor backriveting the stiffners to the skins. The only issue was pulling off the rivet tape when backriveting - my finger nail lifted some paint on the outside of the skins. However, the only reason i painted the outisde of the skins was because i had some paint left, and i had not cleaned or etched this side of the skins. The paint seemed to adhere well initially, despite the finger prints and oils etc left on the skin. I only painted this side as i had some paint left over, but i will use it as a test to see how durable the primer is with no prep whatsoever.
Email to Stewart Systems
I was not sure if my experiences with the thickness of the paint was normal, or if i did the right thing by thinning it, so i emailed Stewart Systems outlining the above and got the following reply:
Trent,
With EkoPoxy, it is normal
for it to get thick like that when it sits for a while. We have noted
that on the info sheet. You should not thin it to correct for that
though. It just needs stirred with a drill stir for a few minutes and it
will come back to a thick liquid form. Then follow the directions for mixing
it and it should be about the right viscosity. You can thin it a little
more than the published ratio, but don’t go too much.
Thanks!
Andy Humphrey A&P
Tech Support
Andy Humphrey A&P
I am not sure how i am supposed to use a drill to stir it as all the available hardware store mixers are way too big - but this warrants further investigation.
Hi Trent,
ReplyDeleteI am in Port Lincoln SA and have just ordered a RV-14A Emp. Reading through your blog and many others and also in touch with some local RV builders. I would be keen to get in touch and pick your brain now and then if you don't mind? my email is Blake dot onl at gmail
Maybe when/if the covid stuff is a bit more relaxed we may even be able to catch up!